
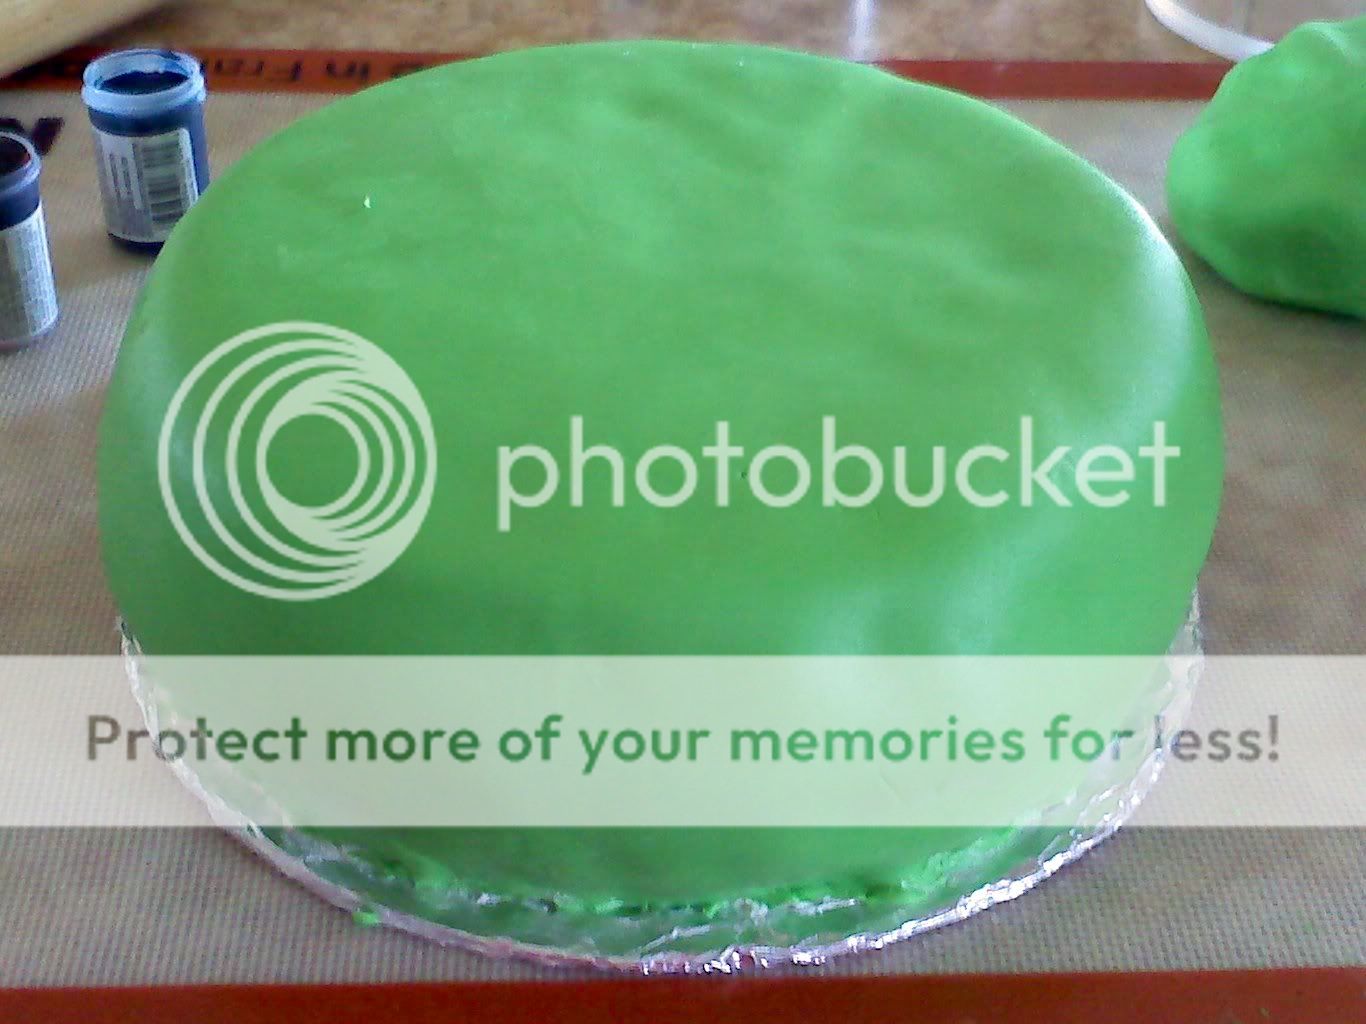
I figured I could make the grass with green fondant and the sky with blue fondant by simply having the green on the bottom part of the cake and blue on the top part. I could cut out a template and make white clouds to layer on the blue and use some cookie cutters to cut out the dinosaurs. Simple, right? Not so much.
One Friday early in August I decided to make Marshmallow Fondant (recipe below) for me to practice with and for the kids to play with. The making part went okay. Only "okay" because I didn't read the directions I just went on my friend's directions of, "One package of marshmallows, a little water, and then about two pounds of powdered sugar." The problem being, my idea of a little water was a teaspoon or two and the real directions call for two tablespoons plus more if necessary. Additionally, I forgot to grease the bowl. That was almost more detrimental than the lack of water. In the end, it worked out fine and I made mental notes of what to do when I made the fondant for Bob's cake at the end of the month.
I let Moo and Bob pick the colors of the fondant and then gave them both a ball in each color. Here is the fondant we practiced with.

We had picked out dinosaur plates and napkins and were wandering around the store when Bob saw a pirate goblet and a treasure box. He asked if he could have those for his birthday to go with dinner, for around $2 total I figured why not. Then he spotted some "freaky" pirate plates and decided he wanted those plates instead of the dinosaur plates. Due to the change I asked if he wanted a pirate cake instead and he said he still wanted a dinosaur cake." Pirates and dinosaurs. . . that kid makes me laugh.
The day of his birthday arrives and we are at the store purchasing a couple ingredients and as we are wandering I see a package of dinosaurs that included rocks and trees. I grabbed those and decided to put those on the cake in place of cutting out dinosaurs with cookie cutters. Then as we were passing the party supplies I saw they had a pirate goody bag kit. Awesome! I could give Bob and his two little friends some pirate booty.
Back at home I got back to work making the stuff for his cake. I made one chocolate layer using this recipe that I used for Moo's cake last year and for the other layer I made Homemade White Cake (recipe below). Each cake had enough batter for one 9-inch round cake and 12 cupcakes. I frosted the cake and some of the cupcakes with Buttercream Frosting (recipe below). I frosted the remaining cupcakes with the Best Cupcake Frosting Ever (that is the name that came with the recipe but it is pretty accurate). Even though I have posted a VERY similar recipe, I had to try this one because Ree (The Pioneer Woman) posted about it on the Tasty Kitchen blog and I feel like I just can't fail when I use her directions. I was not disappointed.
All the baking went pretty well other than I cannot for the life of me bake the Hershey's Chocolate Cake/cupcakes without them sinking in the middle. Last year the same thing happened so I am not quite sure what I do wrong. It still tastes good and that is all that matters (that is what I have to keep telling myself anyway). Also, the white cake baked with a raised middle so I just assembled the cake with the middles together and it worked out fine.
For your enjoyment, I actually took a couple "during" photos this time. Here is the cake with the frosting.


I would make everything again. I will be trying my hand at fondant again, I think there are a lot of possibilities there. I liked the white cake but I am going to try making it with butter instead and see if it turns out the same--I prefer using butter over using shortening but since I hadn't made the cake before, I followed the directions. While the kids enjoyed the fondant on the cake or plain, PE and I picked it off and just enjoyed the cake with the buttercream frosting.
~ + ~ + ~ + ~ + ~ + ~ + ~ + ~ + ~ + ~ + ~
Marshmallow Fondant
adapted from Annie’s Eats
Print Recipe
vegetable shortening, for greasing bowls, utensils, and work surface
16 oz. bag plain marshmallows
2 Tbsp water, plus more if necessary
1 tsp vanilla extract
1 tsp almond extract
2 lbs. confectioners’ sugar, divided
pinch of salt
Using the shortening, grease a large microwave-safe bowl and a spoon/spatula (or two). Add the marshmallows and water to the prepared microwave-safe bowl and microwave for 60 seconds. Stir with the greased spatula/spoon. If not all the marshmallows have melted, microwave for 30 more seconds. Stir in the flavoring. Add half confectioners’ sugar along with the salt to the marshmallow mixture and stir with spatula; combining slightly. Pour mixture onto greased silicon mat or counter. Using greased hands, mix marshmallow and powdered sugar mixture until fully incorporated. Add all but 1 cup of the remaining confectioner’s sugar and continue to knead until fully combined. If necessary add remaining 1 cup of confectioner’s sugar 1/3 cup at a time until it is no longer sticky. Turn the fondant out onto a piece of plastic wrap. Rub a bit of shortening on the outside of the ball. Wrap tightly with the plastic wrap, place it in a Ziploc bag and let rest for at least 2-3 hours. Keep the unused portions covered when not in use. If the fondant becomes stiff, microwave for 20 seconds at a time until it becomes pliable. To add color place desired amount of fondant on silicone mat or plastic wrap. Slightly flatten the fondant and place food coloring in the center. Fold the edges of the fondant over the food coloring and continue to mix until color is evenly distributed.
~ + ~ + ~ + ~ + ~ + ~ + ~ + ~ + ~ + ~ + ~
Homemade White Cake
from Cooking During Stolen Moments
Print Recipe
3/4 cup shortening or margarine
1 1/2 cup sugar
1/2 tsp vanilla extract
1/2 tsp almond extract
2 1/3 cup flour
2 tsp baking powder
1/4 tsp salt
1 cup cold water
4 egg whites
In a large mixing bowl, cream shortening or margarine with sugar until fluffy, about 5 minutes. Add extracts. Combine the flour, baking powder, and salt; add to creamed mixture alternately with water. Beat just until combined. In another mixing bowl, beat egg whites on high speed until stiff peaks form; fold into batter. Pour into two greased and floured 9-in. round baking pans. Bake at 350 for 25-30 minutes or until a toothpick comes out clean. Cool for 10 minutes; remove from pans to wire racks to cool completely.
~ + ~ + ~ + ~ + ~ + ~ + ~ + ~ + ~ + ~ + ~
Buttercream Frosting
from Your Homebased Mom
Print Recipe
1 cup butter
4 ups powdered sugar
1/4 tsp salt
1 tsp vanilla extract
1/3 cup heavy whipping cream
In a mixer cream butter until fluffy. Add sugar and continue creaming until well blended. Add salt, vanilla, and whipping cream. Blend on low speed until moistened. and then beat at high speed until frosting is fluffy.
~ + ~ + ~ + ~ + ~ + ~ + ~ + ~ + ~ + ~ + ~
Best Cupcake Frosting Ever
adapted from Tasty Kitchen
Print Recipe
1 cup milk
5 Tbsp flour
1/2 tsp double strength vanilla
1/2 tsp food coloring
1 cup butter
1 cup granulated sugar (not Powdered Sugar!)
In a small saucepan, whisk flour into milk and heat, stirring constantly, until it thickens. Remove from heat and let it cool to room temperature. Stir in vanilla and food coloring. While the mixture is cooling, cream the butter and sugar together until light and fluffy. Then add the cooled milk/flour/vanilla mixture and beat until it all combines and resembles whipped cream. Frost cake or cupcakes. *I used the double strength vanilla so I could use liquid food coloring. The liquid contributed from the liquid food coloring can effect how the frosting whips. I recommend using gel food coloring if you want to color the frosting.
~ + ~ + ~ + ~ + ~ + ~ + ~ + ~ + ~ + ~ + ~
No comments:
Post a Comment